Wednesday, January 30, 2013

365 Project: Day 30

Day 30 and I am starting to see faces in the clouds... Don't know if that's a good sign ;)

365 Project: Day 30

Been busy and exhausted lately. Will try and write a decent post as soon as I've got my mojo back ;)

Sunday, January 20, 2013

Warm Winter Days


Or actually, extremely COLD winter days ;) Outside the wind is blowing from the east, bringing snow and freezing temperatures. Inside, fortunately, it's warm and cozy. It's the perfect weather to stay in, crawl under a blanket, watch movies and drink lots of tea and warm chocolate. 


It's also the perfect weather to apply some finishing touches to our living room. I absolutely love my new furniture!! Especially the new sofa in combination with my black & white rug and homemade crochet blanket you see in the first picture :) I'm actually working on another blanket that will look even better, but it might be some time until it's finished... 

Meanwhile, I got a pear in the post the other day, and I finally got around to hanging it! 


Love it so much!! :) My home is really starting to become a bright, colorful place, and I like it a lot! It brings a bit of sunshine when outside there's nothing but cold winds and snowstorms...

365 Project: Day 20

But hey, it's almost Spring, right?

(...)

Right?!?

...

:(

Wednesday, January 16, 2013

365 Project: Day 15 + 16

Winter has finally arrived here in my corner of the world. Temperatures are low (which means wearing all kinds of ridiculously warm hats - yay! :) and yesterday it just kept on snowing. It was the good kind of snow, the kind that makes creaky noises beneath your boots and dances in the wind. I tried to photograph the sky, with the snow flying up and down at the same time, in all its prettiness... but all the pictures seemed to depict the falling ashes after a volcano eruption... ;)

365 Project: Day 15

And today? Today the skies were a clear blue, the sun was shining and the snow was filled with the footsteps of humans, cats, dogs and birds. I photographed this beautiful magpie, sitting high up in a tree, looking down on the world.

365 Project: Day 16

Must have been a pretty good view :)

Tuesday, January 15, 2013

Retail Therapy

After 3,5 months of waiting and living in a room so messy it felt more like I was camping, my new sofa & chairs arrived last week!! The colors - moss-green for the sofa and dark-yellow for the chairs - are absolutely wonderful and look really great together.

The only problem with having such pretty new furniture is... a lot of the other stuff in my house suddenly seems super plain! Plus, after tidying up the place it all just felt a bit empty and impersonal.

So...


... off to Ikea I went to get us some happy, colorful accessories. Of course I came back with loads of stuff that wasn't on the list, like a black and white rug and the cutest birdy-tray EVER, but with Ikea that is kind of inevitable ;)


Anyway, my little shopping trip payed off, and after months of living in a room filled with clutter, my house is starting to feel like a home again. 

I will be back with more pictures when the room is done! :)

Sunday, January 13, 2013

365 Project: Day 13

Day 13 of my 365 Project and what a wonderful day it was. The skies were blue, the air crispy cold and the sunshine warm and uplifting. I went to the city of Utrecht with my best friend to enjoy a Cultural Sunday, during which cultural events are organized throughout the city. The Dom Tower looked beautiful, we took a short stroll through the monastery garden, there was dance and music, hot chocolate and cake.

In short: today was a Good Day :)

365 Project: Day 13


Wednesday, January 9, 2013

Plant Life

I absolutely love how plants cozy up a home and brighten up the place. That being said, I know absolutely nothing about plants, and after killing my third fern - rest in peace, ferns! - I needed to look for a plant more... Jenny-proof. And I think I finally found it: succulents!!!


To be honest, succulents always seemed a bit boring to me. But they are so much more beautiful and interesting than I thought they would be! And the most important thing? I am actually able to keep them alive!! :)


And not just alive: they actually grow! One grew so much, a part became so heavy it broke off!! (...) Okay, as I write this I realize that's probably a bad thing and not something to be proud of,  but it does lead me to another thing I love about succulents: even when a part breaks off, they can be saved!


The little succulent you see in the picture below grew out of the much bigger specimen in the picture above, and somehow broke off. So I stuck it in a bit of earth AND IT JUST KEPT GROWING!


It actually grew ROOTS. Now, for a complete plant-noob like myself, that's just plain cool. It also means I can experiment with the plants, and experimenting is always fun. 

For example, a few days ago a pretty large 'flower' broke off of another big succulent, so I planted it in some earth. Will it grow roots? Only time will tell ;)


During that same 'incident' a few leaves came off. And what do you know? Apparently even the leaves can grow new succulents! So I'm giving that a try now :)


Since I have a sneaky suspicion succulents shouldn't fall apart so often, I should probably read into that. But at least I'm trying, right? And between the parts of succulents and other small plants I'm trying to save (mostly after vicious attacks from our cats...) my windowsill is now a miniature plant hospital!


Let's just hope my nursing skills have improved since the ferns... :S

Sunday, January 6, 2013

365 Project: Day 6

Day 6 of my 365 Project and the sky was absolutely beautiful. Love the seagull that happened to fly into frame just as I took the picture :)

365 Project: Day 6

You can find all the photographs here.

Sunburst Granny Square Blanket Tutorial


Hey everyone! Once upon a time I made a Sunburst Granny Square blanket for my niece, took some pictures and posted them on my old blog. And oh what a lot of question I got about it!! In particular:
1) What's the pattern?
2) What yarn did you use?
3) How did you join the squares?

So I thought it was finally time to write a proper post about one my favourite crafty projects of all time: The Sunburst Granny Square blanket!!


Now, the first thing I have to mention is that I did not design this from scratch. It is based on a pattern by Priscilla Hewitt, and the original pattern contains more rounds. I've posted the link to this original pattern severel times but apparently it doesn't work for a lot of you. If you are interested in the original pattern, please try this link - hopefully it will work.

Sizes & yarn
I used four rounds to make the Sunburst Granny Squares for the blanket, and they are about 4 inches in size. I used a 4mm crochet hook and Schachenmayr SMC Bravo. This yarn is 100% acrylic, machine washable and it comes in many, many great colors.

Stitches
Half double crochet (hdc): yarn over, insert hook in next stitch, yarn over and pull loop through stitch (3 loops on hook). Yarn over and pull through all three loops on hook.

Double crochet (dc): yarn over, insert hook in next stitch, yarn over and pull loop through stitch (3 loops on hook). Yarn over and pull through two loops on hook (2 loops remaining on hook). Yarn over and pull through two remaining loops on hook.

Puff stitch: *yarn over, insert hook in indicated stitch and draw yarn through stitch* three times (7 loops on hook). Yarn over and pull through all loops on hook. Chain 1 to lock.

Cluster stitch: *yarn over, insert hook in next stitch and pull up a loop, yarn over and pull through 2 loops* 4 times (5 loops on hook). Yarn over and pull through all loops on hook.

Treble stitch (trbl): Yarn over hook twice, insert hook into next stitch. Yarn over hook and draw yarn through stitch (4 loops on hook). Pull yarn through two loops (3 loops remaining on hook). Yarn over and draw through two loops (2 loops remaining). Yarn over and draw through the last two loops on hook.

Round 1
I prefer to start with a magic circle, but if you'd rather start with a chain: chain 5 and join with a slip stitch. Next, chain 3 to count as the first double crochet and work 15 more double crochet stitches into the ring. Join with a slip stitch to the top of the beginning chain 3. (16 double crochet stitches in total) Fasten off.


Round 2
Attach next color with a slip stitch to any dc, chain 1, puff stitch in the same stitch and in each dc around. Join with a slip stitch to the first puff stitch. (16 puff stitches in total) Fasten off.


Round 3
Attach next color with a slip stitch in the chain 1 space of any puff stitch, chain 2, (cluster stitch, chain 2) in the same space and in each chain 1 spaces around. Join with a slip stitch to the beginning cluster stitch. (16 cluster stitches in total) Fasten off.


Moment of choice: crochet together or join as-you-go?
Now you have a choice to make. If you plan to join the squares - to make a blanket for example - then you have to make a decision about how to join the squares before you start round 4. You have two options: finish all the squares seperately and sew or crochet the squares together* (in which case you can proceed with round 4) or join the squares as-you-go* (in which case you can proceed to make a required amount of three-round granny squares/rounds which you can eventually join).

* For a tutorial about crocheting squares together, click here. For a tutorial about joining squares as-you-go, click here. Both tutorials are from the wonderful Lucy of Attic24


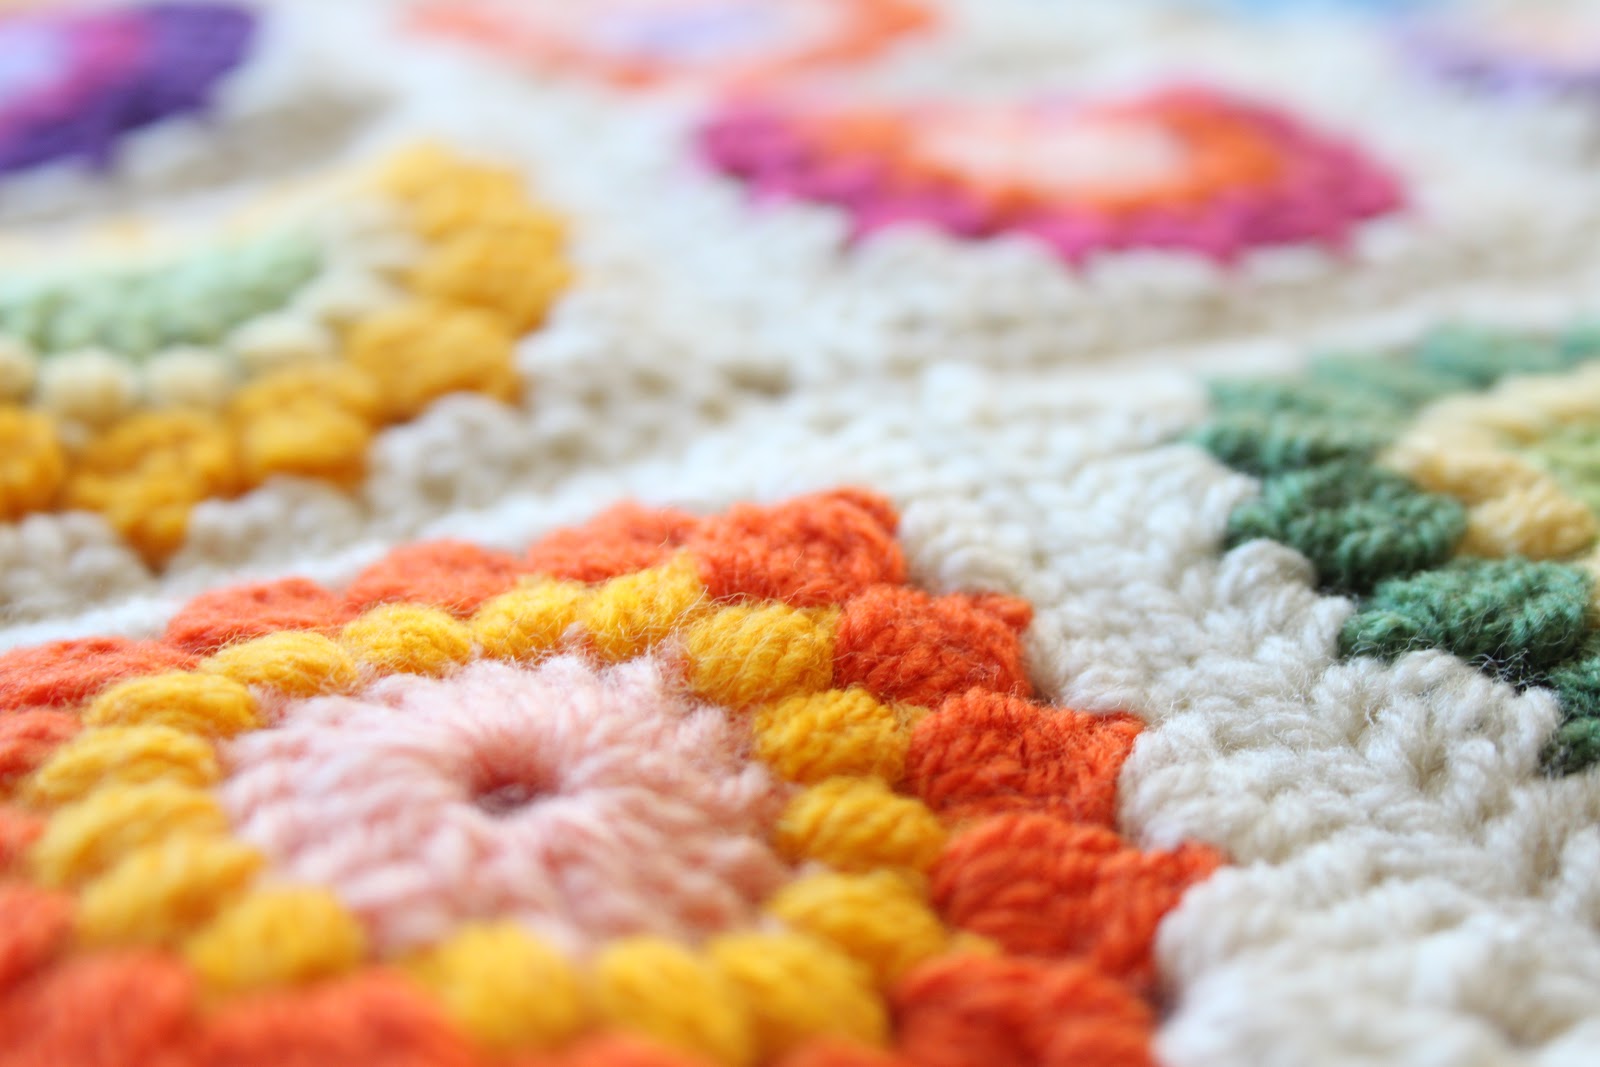
For the blanket pictured in this post I used the first option (crocheting the finished squares together). As you can see in the above picture it looked very neat up close, but the overall effect was in my opinion a bit too wobbly (see picture below). This is probably because I did something wrong (like crocheting the squares together to tight?) but in any case I nowadays prefer to join my squares as I go, which gives a better 'flow' to the blanket in my opinion.


Round 4
Whatever you choose, you will need round 4 sooner or later. I prefer to use the same color (white or black) for every fourth round of every square to create unity, but of course you can use any color you want.

To start round 4 attach your next color with a slip stitch to any chain 2 space. Chain 4 to count as the first treble stitch and then crochet two treble stitches in the same space. Now, the next steps might sound a bit tricky, but it's not as bad as it seems: you're basically going to turn your Sunburst rounds into squares. In the picture below you can see which stitches you'll use for the straight lines (pink) and the corners (blue).


First crochet *3 dc in the next chain 2 space, 3 hdc in the next chain 2 space and 3 dc in the next chain 2 space*. You now made one of the four straight lines of your square. Next, you'll make your first corner: all in the next chain 2 space crochet 3 treble stitches, chain 3, and another 3 treble stitches. Repeat this sequence (straight line + corner) two times, then repeat from * to * (straight line) once. To finish your last corner: crochet 3 treble stitches in the same space as the beginning treble stitches, chain 3 and join with a slip stitch to the top of the beginning chain 4.

Fasten off and your Sunburst Granny Square is done!!


I had a lot of fun writing this tutorial, and if it proves at all helpful to anyone out there then that's a nice bonus ;) If you've made a Sunburst Granny Square blanket yourself, please post a link in the comments; I would love to see it! :)

Friday, January 4, 2013

365 Project: Day 4


Still enjoying the sky, even though it has been quite grey these past few days ;) I'm collecting my photographs for my 365 Project on 365project and Flickr!

Wednesday, January 2, 2013

A January Walk

We've been having the most gentle winter in my corner of the world so far, and I can't say that I mind. At all. Sure, snow can be great, but the dark winter months sure feel a lot shorter when it's not bitterly cold and you can go for a walk without freezing your nose off.

I'm still enjoying the hell out of my brand new Hunter boots :) I love how I can just barge through puddles of rain and mud while everyone else has to stay on the dry pathways (of which there are few these days ;)

But still: let's hope this gentle weather keeps it up until February, and Spring will arrive early March :) 


And until then? I will walk in the mud, and photograph the sky.

Starting a 365 Project: Day 1

Every year, for some reason, I always think about starting up a 365 Project... at the end of January. And  by that time I always feel like it's too late to bother. This year however, I'm on time, and I'm ready to get started!

Now, for someone as whimsical as myself, a 365 Project is a BIG commitment. So I wanted to choose a subject that's easily available, always ready for action, and at the same time interesting enough to make 365 photographs of. So what did I choose?

I chose the sky :)


It's always magnificent, it never stops being interesting, it's always there and too often I forget to stop and notice. 

So this year I'm watching the sky. And I can't wait to get started! :)

Tuesday, January 1, 2013

A Very Happy New Year!

First of all: a very happy new year to you, and welcome to Nittybits!!

After blogging at The Writing Tree for seven years I decided it was time for a fresh start. And what better time for a fresh start than on the first day of a new year? :)

Here on Nittybits I hope to share the little things in life that make me happy: bits of daily life, bits of photography, bits of crafting, bits of colour and everything else that makes life just that much more enjoyable.

I will keep expanding Nittybits over time, adding pages and tutorials, so keep posted! Feel free to leave a comment, send an e-mail, leave a link to your website or just stop by for a visit every once in a while.

Hope to see you around :)

Love,
Jenny